PAINTING THE BRIDGE OF PEGASUS
Alan Mander of Mandertory Miniatures wraps up our mini-series on how to build and paint the Pegasus Bridge battle-set…
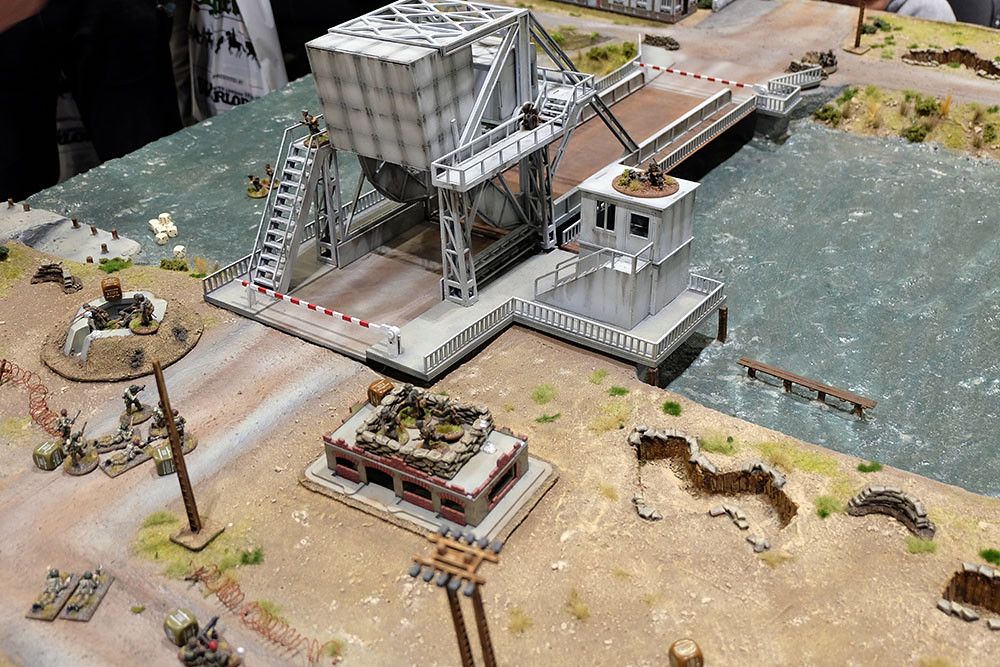
Alan: Following on from our last piece about how we created the board, this one is about how I painted the Bridge. I should tell out that I received the bridge already completed, so I haven’t provided any instructions on how to assemble it. Unless otherwise noted, all Vallejo Model Color paints were used.
Preparation
I began by walking around the bridge, checking for any rough edges where the parts were joined to the frames. The girders, which were constructed from numerous strips of MDF, were then filled with green material to give them the appearance of being one solid piece of metal. Green substance was also utilised to conceal any joints on the road and on the sides of the bridge, as shown in the photos.
After that, the entire bridge was sprayed black. Because the model was made of MDF, the undercoat dried quickly, allowing me to begin painting right away. There are three main textures/color palettes you’ll be using on the bridge: 1) The metalwork of the bridge and control tower, 2) the woodwork of the road and pathways, and 3) the concrete at the bridge’s ends where it connects the road.
I used an airbrush to paint the metalwork and concrete parts of the bridge, but same concepts apply if you use brushes.
The metalwork was painted.
Dark Grey was used to cover all of the bridge’s metal surfaces.
Once everything was dry, the first highlight was painted with Stone Grey, being careful to leave the most recessed parts dark grey (such as the connections in the counterweight panels). Because the MDF absorbs the paint, you may need to apply many coats to achieve an even coating.
The next highlight was added once the Stone Grey had dried. A 60/40 combination of Light Grey and Stone Grey was used.
After that, the metal work was highlighted with an 80/20 blend of Light Grey and Stone Grey. Little Grey was the next highlight, followed by a light dusting of Light Grey and White (70/30 blend).
I masked off the portions that contacted either the concrete or wooden areas when all the paint on the metal work had dried, then proceeded on to painting the concrete areas.
The concrete portions were painted.
All of the concrete areas were base painted in Dark Grey, with Light Grey as the first highlight, followed by a 50/50 blend of Light Grey and Stone Grey as the second highlight.
After that, a 70/30 blend of Stone Grey and light grey was used to emphasise the concrete sections. Because we wanted to replicate the texture of concrete on the flat MDF, this highlight was not placed consistently. For a final highlight, white was added to the mix.
The woodwork is being painted.
A base coat of Game Colour Charcoal Brown was applied to all of the bridge’s wood surfaces (German Black Brown from the model colour range would be a good alternative). The planks were then marked out with a fine tip black felt tip marker once this had dried. The planks on the walkways were 5mm apart, but the ones on the bridge were 1cm apart. We did both sides of the roadway/footpaths so that when the bridge was raised, the timber planking would still be visible.
The woodwork was highlighted with Game Colour Parasite Brown after the black marker had dried. This accent was painted on to give the planks a wood grain appearance.
Buff was the next highlight. This was painted on again to give it a wood grain feel, with additional care taken to ensure that the highlight matched the black marker. This gave the planks a nice contrast and helped them stand out.
Finally, a sepia wash was applied to all of the wooden parts, which helped to tie the colours together and reduce the contrast between the highlights. Brushing it heavily onto the woodwork will wash the black marker off, so be cautious not to use too much wash and make sure you apply it after you’ve marked the planks.
The inspection stations at each end of the bridge were also painted at this time. They were first base coated in Dark Grey, then accentuated with Light Grey, and finally white. The chevrons were marked in place with a pencil after the white had dried. Burnt Cadmium was used as a base coat, and Flat Red was used to accent them.
Keeping the bridge in good condition
The metal portions of the bridge were given a coat of Gloss Varnish after they had been painted to allow them to weather.
First and foremost, the gears on the bridge mechanism were painted to appear oiled. This was accomplished by blending black and brown ink (30/70 mix) and applying it to the bridge’s cogs. This was done in layers until we were satisfied with the result.
The bridge’s painting was then ‘chipped.’ This was accomplished by softly sponging German Grey onto places that would see a lot of wear and tear (steps, handrails, etc.)
After thinned with white spirit, burnt umber oil paint was painted around any edges that would be exposed to the outdoors and allowed to cure for 5 minutes. The paint was then brushed with a soft brush to create streaks where rainwater would have ran down the bridge. Make sure that all of the streaks flow in the same direction and in a reasonable order (down the bridge, gravity!)
After that, the oil paint was allowed to dry for 24 hours (you could speed up the drying process with a hairdryer)
Matt Varnish was applied to the bridge.
To make the wooden road more weatherproof Dark Mud and European dust weathering powders (made by Mig manufacture) were mixed together and thinned with white spirit before being painted over the roadway, taking care to simulate heavy vehicle traffic. Check to see if the planks are still visible at the roadway’s margins and in a few other spots on the bridge. Small amounts of European Dust weathering powder were sprinkled on it while it was drying. After the paint had dried, the weathered road was brushed with a delicate brush. After that, a light coat of Matt Varnish was applied.
To bind the concrete road parts of the bridge onto the board, the same weathering procedures that were used on the roads on the board were used.
After that, the Bridge was finished.